
DAY_104 실장비 서버 구축
tomcat 8.0 대 설치 할 경우
1. jdk 설치
jdk파일 다운받기 ( oracle에서 다운받기)
다운 받은 파일을 winscp로 옮기기
cd /usr/local/src에 옮긴 파일 넣기
gunzip jdk~
tar jdk~
압축을 풀면 jdk폴더 생성
mv jdk~ /usr/local
cd /usr/local
ln -s jdk~ java (java로 심볼릭 링크)
/etc/profile을 열어서 추가하기
JAVA_HOME=/usr/local/java
CLASSPATH=.:$JAVA_HOME/lib/tools.jar
PATH=$PATH:$JAVA_HOME/bin
export JAVA_HOME CLASSPATH PATH
source /etc/profile
java -version
javac -version
2. 톰캣 설치하기
cd /usr/local/src
mkdir tomcat
cd tomcat
생성한 tomcat 디렉터리에 tomcat파일을 다운 받은것 풀어주기
톰캣 다운로드 사이트
tomcat.apache.org
압축 풀기
gunzip apache-tomcat-~
tar -xzf apache-tomcat~
압축 풀고 /usr/local/server으로 이동 및 링크하기
mkdir /usr/local/server
mv apache-tomcat~ /usr/local/server
cd /usr/local/server
ln -s apache-tomcat-~
/etc/profile 파일 수정하기
vi /etc/profile
JAVA_HOME=/usr/local/java
CATALINA_HOME=/usr/local/server/tomcat
CLASSPATH=.:$JAVA_HOME/lib/tools.jar:$CATALINA_HOME/lib-jsp-api.jar:$CATALINA_HOME/lib/servlet-api.jar
PATH=$PATH:$JAVA_HOME/bin:$CATALINA_HOME/bin
export JAVA_HOME CLASSPATH PATH CATALINA_HOME
변경 적용 및 tomcat 시작
source /etc/profile
/usr/local/server/tomcat/bin/startup.sh
( 톰캣 서버 중지는 /usr/local/server/tomcat/bin/shutdown.sh )
톰캣 설치 후 8080으로 들어가 보기 & netstat로 포트 확인하기
3. tomcat-connector 다운 및 설치하기
tomcat-connetor 다운 받기
tomcat.apache.org에서 다운받기
#cd /usr/local/src 에 다운 받은 파일 위치하기
압축 풀기
#tar -xzvf tomcat-connector~
압축을 풀고 tomcat-connector 에 있는 native 폴더로 이동한다.
소스 컴파일 하기
# ./configure --with-apxs=/usr/bin/apxs
#make
#make install
# ls -l /etc/httpd/modules/mod_jk.so
# vi /etc/httpd/conf/httpd.conf
-- /etc/httpd/conf/httpd.conf --
:
:
# 모듈 로드
LoadModule jk_module modules/mod_jk.so
JkWorkersFile "conf/workers.properties"
# 로그파일
JkLogFile "logs/mod_jk.log"
JkLogLevel info
# 로그형식
JkLogStampFormat "[%a %b %d %h:%M:%S %Y]"
JkRequestLogFormat "%w%v%T"
# 해당 확장자를 처리한 worker를 지정
JkMount /*.do worker1
JkMount /*.jsp worker1
JkMount /servlet/* worker1
JkShmFile run/mod_jk.shm
NameVirtualHost *:80
<VirtualHost *:80>
DocumentRoot ( 톰캣 설치 디렉터리 : 위에서 처럼 설치 했다면 /usr/local/server/tomcat/webapps )
ServerName 자신의 ip주소
jkMount /* worker1
ErrorLog logs/error_log
CustomLog logs/access_log combined
</VirtualHost>
-- /etc/httpd/conf/httpd.conf --
# vi /etc/httpd/conf/workers.properties
-- /etc/httpd/conf/workers.properties --
worker.list=worker1
# protocol
worker:worker1.type=ajp13
# host
worker:worker1.host=localhost
# port
worker:worker1.port=8009
-- /etc/httpd/conf/workers.properties --
아파치 톰캣 연동하기

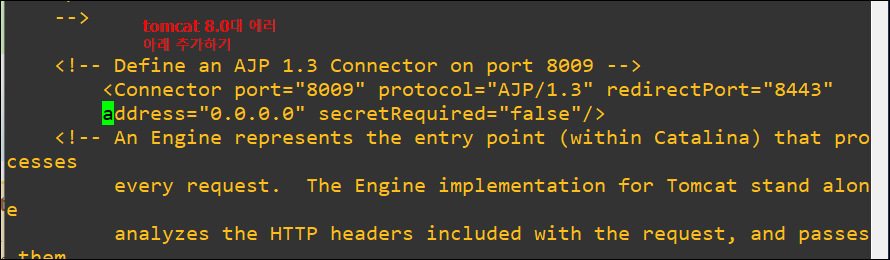
4. 설치 후 방화벽을 설정한다.
방화벽은 firewalld를 중지하고 iptables-services 를 이용한다.
22, 80, 8080, 127.0.0.1 이외의 모든 IP주소와 포트는 접속하지 못하게 한다.
[root@localhost html]# cat /etc/sysconfig/iptables
# Generated by iptables-save v1.4.21 on Wed May 26 11:58:27 2021
*nat
:PREROUTING ACCEPT [1:78]
:INPUT ACCEPT [1:78]
:OUTPUT ACCEPT [0:0]
:POSTROUTING ACCEPT [0:0]
#-A PREROUTING -p tcp -m tcp --dport 80 -j REDIRECT --to-ports 8080
COMMIT
# Completed on Wed May 26 11:58:27 2021
# Generated by iptables-save v1.4.21 on Wed May 26 11:58:27 2021
*filter
:INPUT ACCEPT [4511:578082]
:FORWARD ACCEPT [0:0]
:OUTPUT ACCEPT [425:277646]
-A INPUT -m state --state INVALID -j DROP
-A INPUT -m state --state RELATED,ESTABLISHED -j ACCEPT
-A INPUT -p tcp -m tcp --dport 80 -j ACCEPT
-A INPUT -p tcp -m tcp --dport 22 -j ACCEPT
-A INPUT -p tcp -m tcp --dport 8080 -j DROP
COMMIT
# Completed on Wed May 26 11:58:27 2021
5. 가상호스트로 apache와 jsp 분리해주기

6. 하나의 서버에 website올리기
-----[wapple]---------[server1]
/etc/httpd/conf/httpd.conf
#
# Specify a default charset for all content served; this enables
# interpretation of all content as UTF-8 by default.  To use the
# default browser choice (ISO-8859-1), or to allow the META tags
# in HTML content to override this choice, comment out this
# directive:
#
AddDefaultCharset UTF-8

<IfModule mime_magic_module>
    #
    # The mod_mime_magic module allows the server to use various hints from the
    # contents of the file itself to determine its type.  The MIMEMagicFile
    # directive tells the module where the hint definitions are located.
    #
    MIMEMagicFile conf/magic
</IfModule>

#
# Customizable error responses come in three flavors:
# 1) plain text 2) local redirects 3) external redirects
#
# Some examples:
#ErrorDocument 500 "The server made a boo boo."
#ErrorDocument 404 /missing.html
#ErrorDocument 404 "/cgi-bin/missing_handler.pl"
#ErrorDocument 402 http://www.example.com/subscription_info.html
#

#
# EnableMMAP and EnableSendfile: On systems that support it,
# memory-mapping or the sendfile syscall may be used to deliver
# files.  This usually improves server performance, but must
# be turned off when serving from networked-mounted
# filesystems or if support for these functions is otherwise
# broken on your system.
# Defaults if commented: EnableMMAP On, EnableSendfile Off
#
#EnableMMAP off
EnableSendfile on

# Supplemental configuration
#
# Load config files in the "/etc/httpd/conf.d" directory, if any.
IncludeOptional conf.d/*.conf

LoadModule jk_module modules/mod_jk.so
JkWorkersFile "conf/workers.properties"
# 로그파일
JkLogFile "logs/mod_jk.log"
JkLogLevel info
# 로그형식
JkLogStampFormat "[%a %b %d %h:%M:%S %Y]"
JkRequestLogFormat "%w%v%T"
# 해당 확장자를 처리한 worker를 지정
JkMount /*.do worker1
JkMount /*.jsp worker1
JkMount /servlet/* worker1
JkShmFile run/mod_jk.shm

<VirtualHost *:80>
    DocumentRoot /var/www/html
    ServerName 192.168.0.192
    #ServerAlias www.sbs.com
    ErrorLog logs/error_log
    CustomLog logs/access_log combined
</VirtualHost>

<VirtualHost *:80>
    DocumentRoot /usr/local/server/tomcat/webapps
    ServerName 192.168.0.192
    jkMount /*.jsp worker1
    ErrorLog logs/error_log
    CustomLog logs/access_log combined
</VirtualHost>
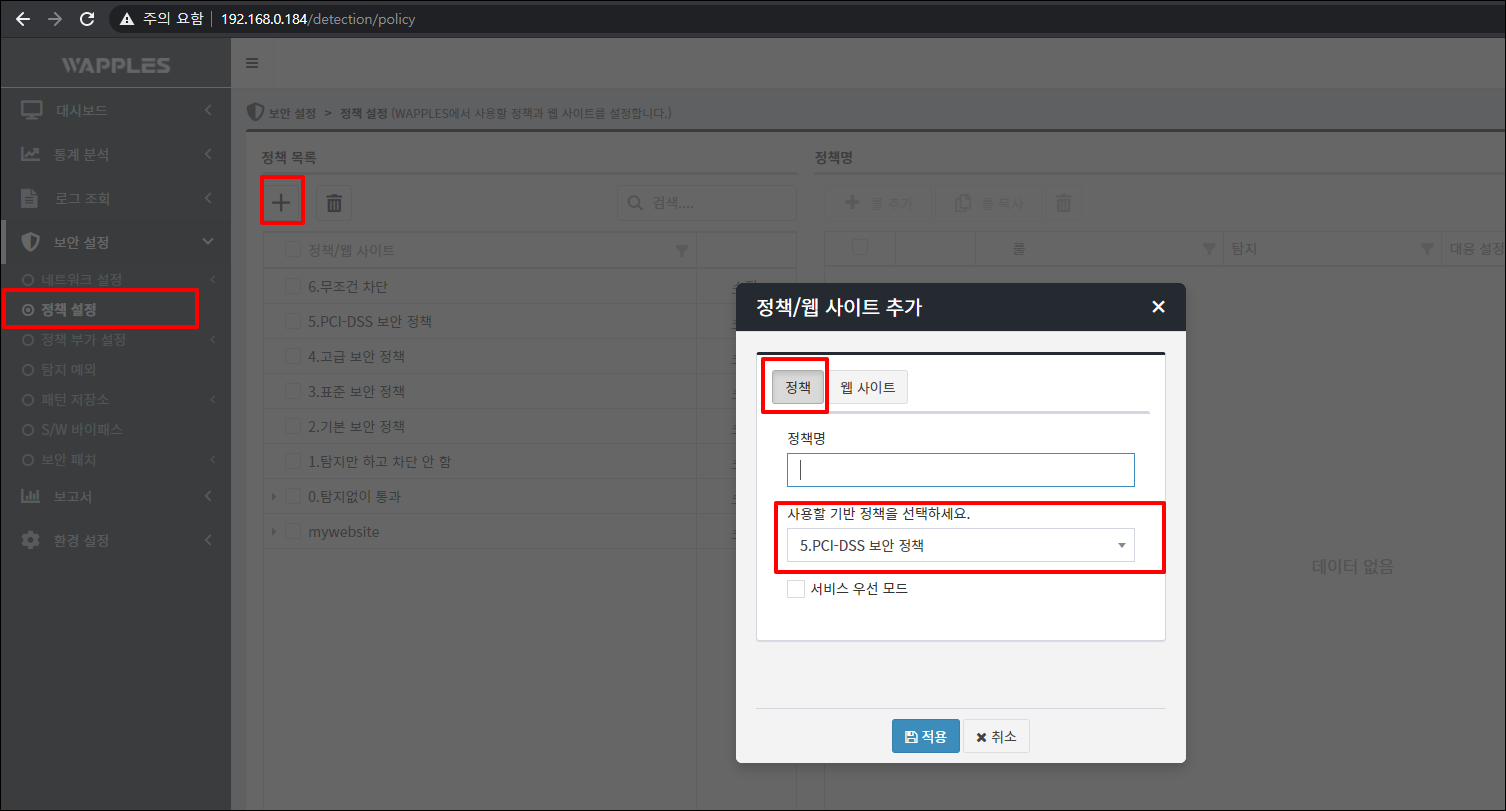
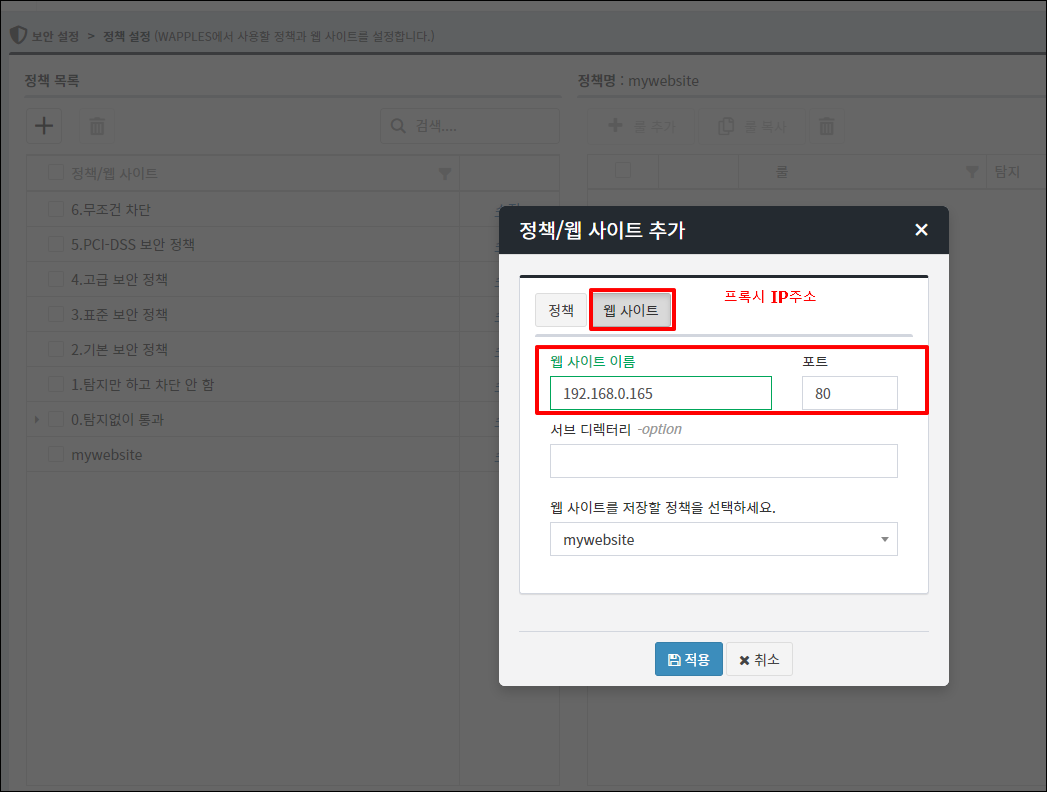
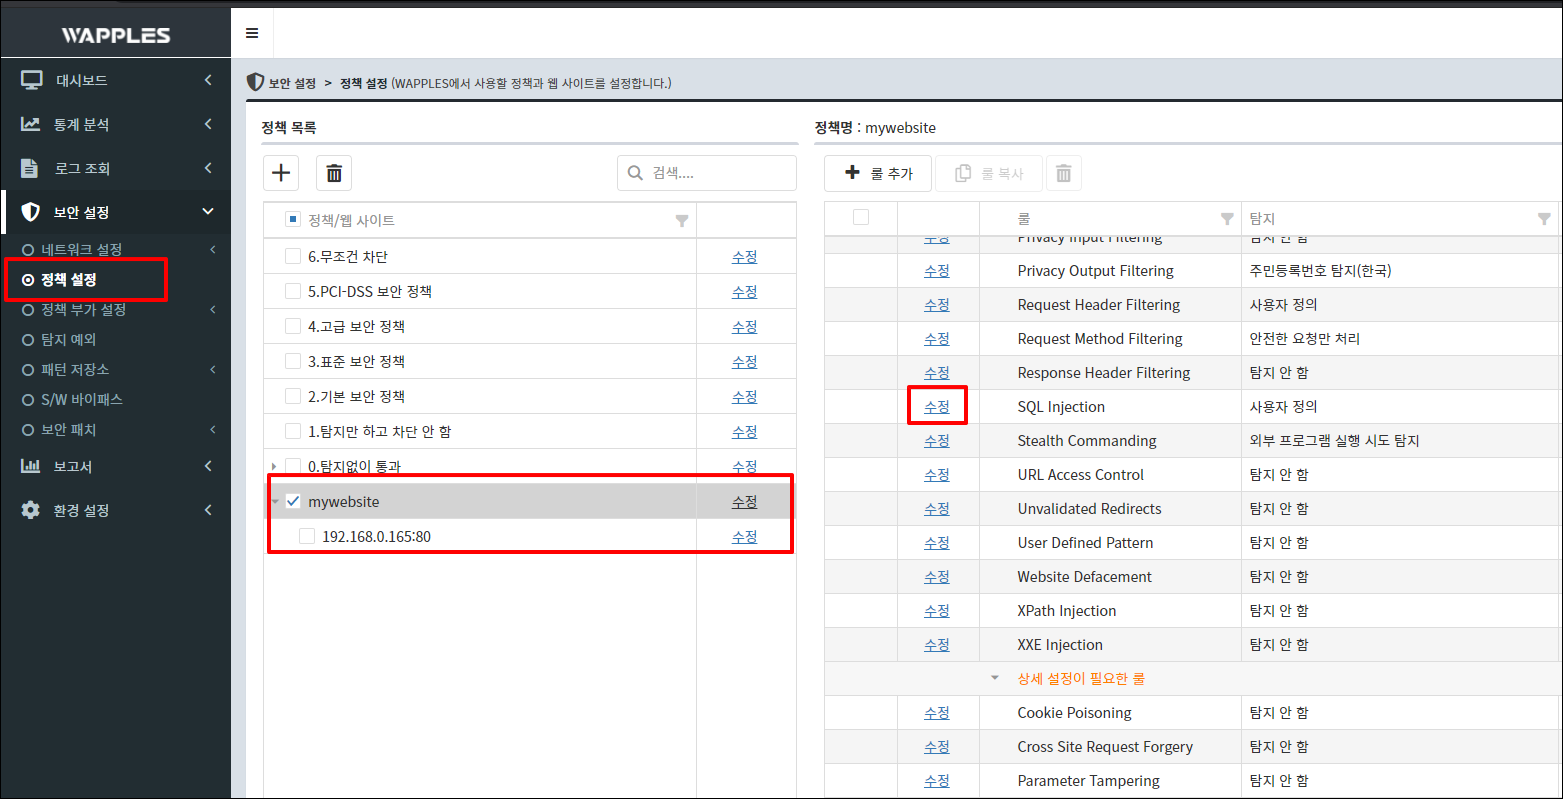
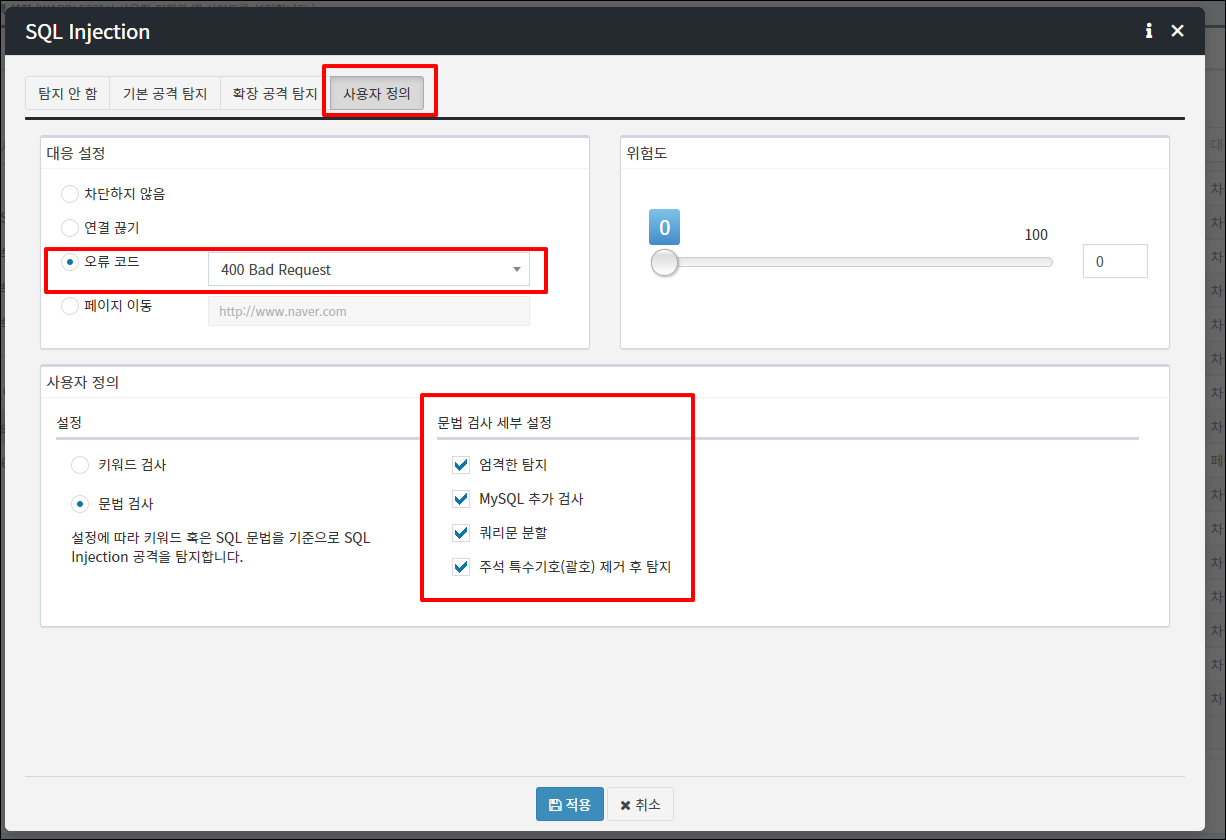
7. wapples 설정
인라인방식 x
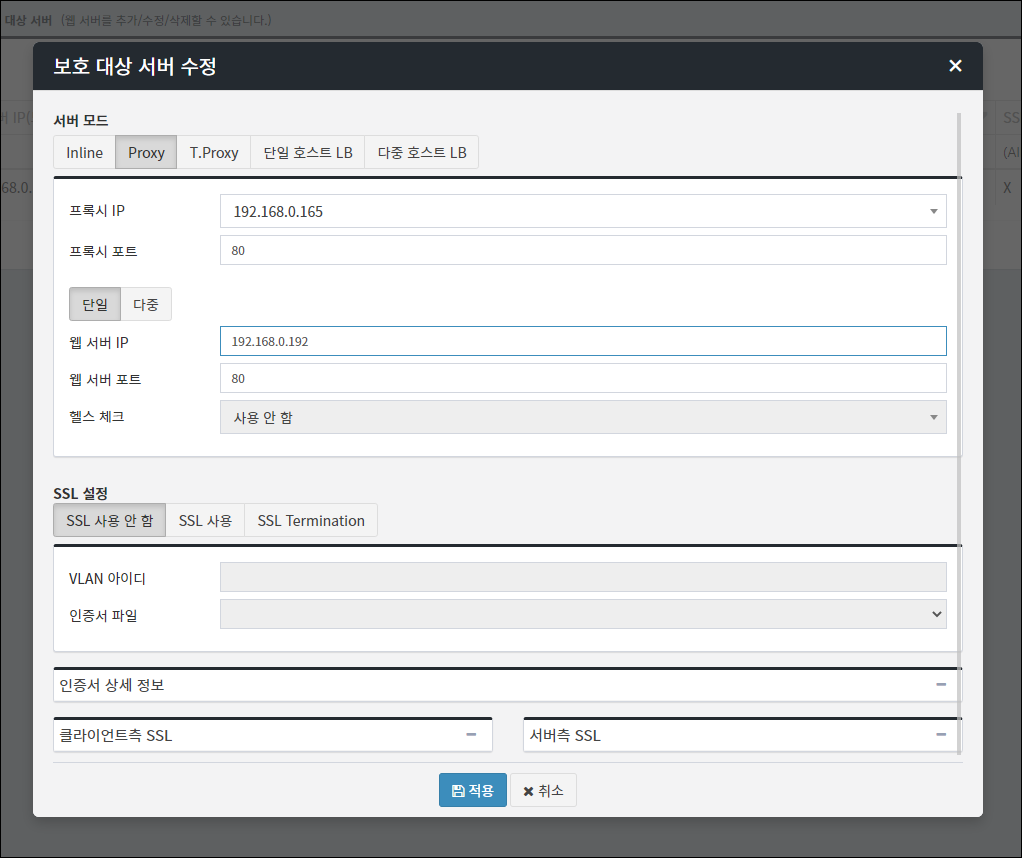
프록시방식 o wapple을 거쳤다가 server1로 갈 수 있도록 한다.
-------+---------------+--------
| |
[wapple] [server1]
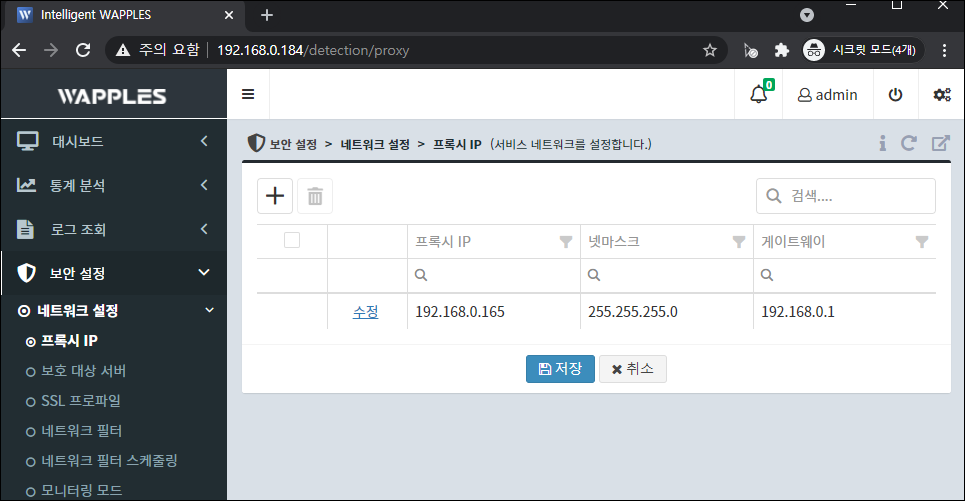
프록시 ip주소 설정
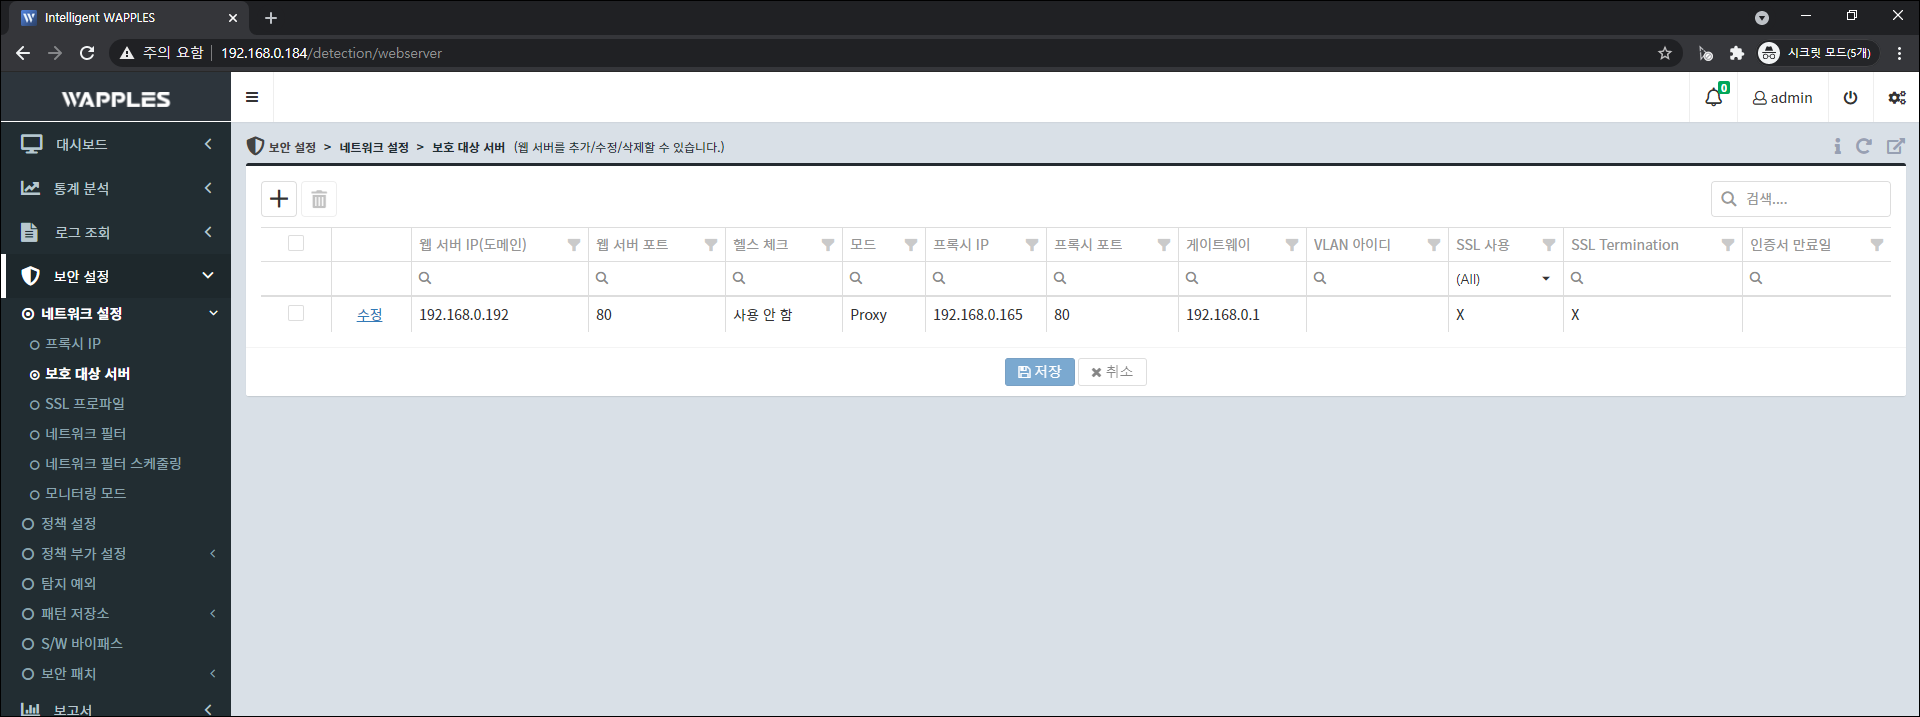
보호대상 ip주소
wapples을 설정했으면 iptables의 값을 바꿔준다.
[root@localhost html]# iptables -F
[root@localhost html]# iptables -A INPUT -p tcp --dport 80 -s 192.168.0
[root@localhost html]# iptables -A INPUT -p tcp --dport 80 -j DROP
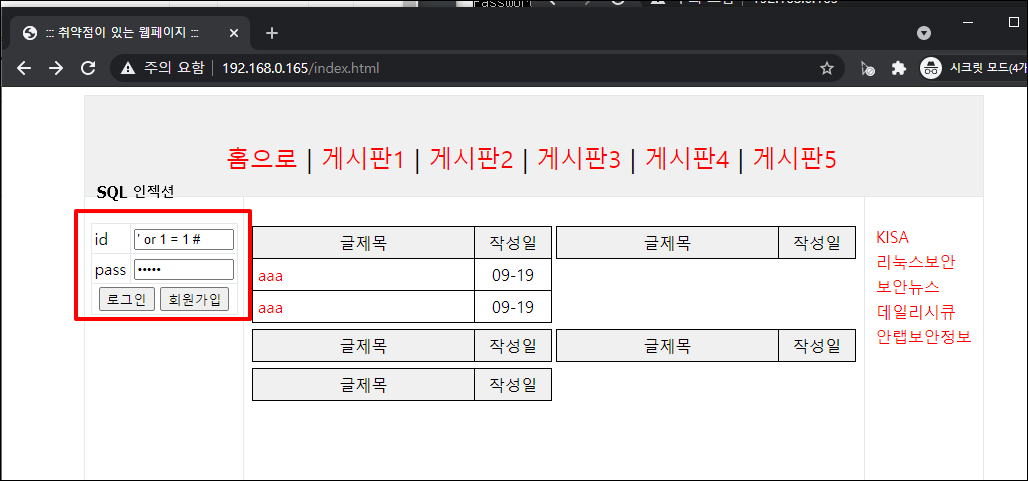
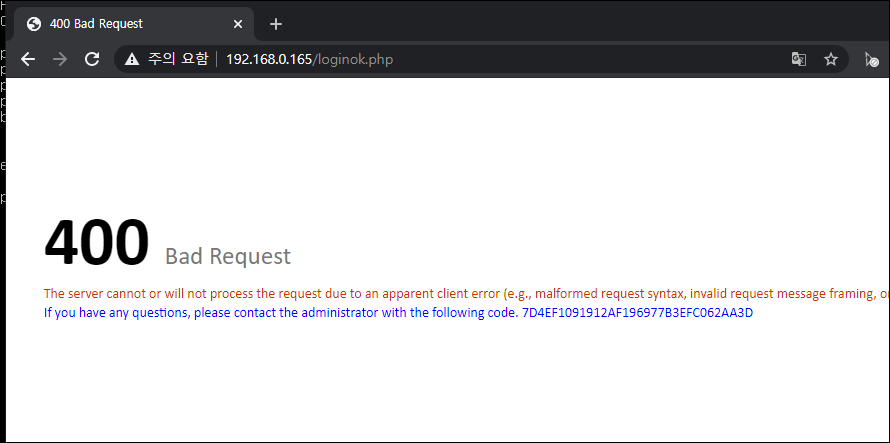
wapples 룰 설정하기
또 다른 가상 vmware
192.168.0.89 - centos7#1-1
root 12345
기존에 ESXI에 있던 vmware 복사한다.
'정보보안(시스템,네트워크) > 리눅스' 카테고리의 다른 글
| DAY_103 실장비 설정 (0) | 2021.05.25 |
|---|---|
| DAY_36 DNS (0) | 2021.02.16 |
| DAY_35 DNS 도메인 설정 (0) | 2021.02.15 |
| DAY_34 MPM, Nginx (0) | 2021.02.10 |
| DAY_33 CGI (0) | 2021.02.09 |