
DAY_26 웹 설정파일
체크리스트
● 프로그램을 설치할 때 소스 컴파일의 장점과 단점에 대해서 설명하시오.
- 장점 : 설치하는 사용자 마음대로 구성을 바꾸어 설치할 수 있어서 좋다. 최신 버전 설치 가능
- 단점 : 설치 과정이 어렵다. 유지보수가 어렵다.
|
하트블리드 취약점 : openssl에서 발견된 취약점 zlib취약점 |
● openssh-8.4.p1.tar.gz 의 소스 컴파일 과정을 설명하시오.
- 소스 다운로드 -> 환경설정(./configure) -> 컴파일(make) -> 설치(make install) -> 세팅
● openssh-8.4.p1.tar.gz 소스 컴파일 시 아래 환경설정에 대해서 설명하시오.
--prefix : 설치 경로를 지정하는 옵션
--with-zlib : 압축 라이브러리 사용 옵션
--with-pam : pam 인증모듈 사용 옵션
● pam 패키지와 pam-devel 패키지의 차이점은 무엇인가 ?
- pam : 애플리케이션과 서비스에 대한 인증을 진행한다.
- pam-devel : pam 개발 라이브러리가 담겨있는 패키지 (프로그램을 소스 컴파일할 때 필요하다.)
● zlib 패키지와 zlib-devl 패키지의 차이점은 무엇인가 ?
- zlib : 압축 라이브러리 패키지
- zlib-devel : zlib 개발 라이블러리 (프로그램을 소스 컴파일할 때 필요하다.)
● 소스 컴파일 시 make 명령어는 무엇이고 어떤 파일을 보고 컴파일하는가 ?
- 여러개의 파일들을 분할해서 소스를 만들었을 경우 그걸 하나로 합쳐서 컴파일하는 방법이다.
- 한마디로 프로젝트 컴파일이라고 생각하면 된다.
- Makefile을 보고 컴파일한다.
● 리눅스에서 개인키/공개키의 키쌍을 생성하는 명령어는 어떤 명령어이고 어느 디렉터리에 있는가 ?
- ssh-keygen, $HOME/.ssh, ~/.ssh
● OpenSSH 서버의 접속 방식 두가지는 무엇인가 ?
- ID/PW 를 이용한 접속, 공개키를 이용한 접속(보안성 더 높다)
● /etc/ssh/sshd_config 에서 PasswordAuthentication 지시어의 의미는 무엇인가 ?
- PasswordAuthentication : ID/PW 인증방식의 비밀번호 인증 지시어
- PasswordAuthentication yes : ID/PW 인증방식 접속O, 공개키 인증 접속 X
- PasswordAuthentication no : ID/PW 인증방식 접속X, 공개키 인증 접속 O
● 웹서버 포트 번호는 몇번인가 ?
- 80
● HTTP는 무엇이고 약자는 무엇인가 ?
- HyperText Transfer Protocol로 웹에서 데이터를 전송하는 규약이다.
● 아파치 웹서버 패키지를 설치한 후 아래 내용에 답하시오.
설정파일 : /etc/httpd/conf/httpd.conf
추가 설정파일이 저장된 디렉터리 : /etc/httpd/conf.d and /etc/httpd/conf.modules.d
로그가 저장되는 디렉터리 : /etc/httpd/logs ->/var/log/httpd
모듈이 저장된 디렉터리 : /etc/httpd/modules -> /usr/lib64/httpd/modules
● SELinux에서 웹서버 포트를 추가할려고 한다. 아래 조건에 맞게 답하시오.
-- 조건 --
1. 포트를 3개 추가한다.
- 8000 : soundd_port_t가 사용하는 포트이다.
- 8001 : 어떤 곳에서도 사용하지 않는다.
- 8002 : xen_port_t가 사용하는 포트이다.
2. 웹서버 설정파일에서 3개의 포트 번호를 추가한다.
-- 조건 --
- 이미 다른 곳에서 사용하면 -m 옵션을 사용한다.
# semanage port -m -t http_port_t -p tcp 8000
# semanage port -m -t http_port_t -p tcp 8002
- 다른 곳에서 사용하지 않으면 -a 옵션을 사용한다.
# semanage port -m -t http_port_t -p tcp 8001
vi /etc/httpd/conf/httpd.conf
- Listen 80
- Listen 8000
- Listen 8001
- Listen 8002
● 서버에서 열린 포트를 사용하는 명령어는 무엇인가 ?
# ss -nltp
# netstat -nltp
● semanage 명령어는 무엇인가 ?
- SELinux Policy Management tool 이다.
- SELinux 보안 정책을 조회/수정/삭제를 관리한다.
Server1 ~# cd /etc/httpd/conf
Server1 conf# cp httpd.conf httpd.conf.bak
Server1 conf# vi httpd.conf
아파치 웹서버를 설치할 때 아파치 웹서버가 인식하는 최상위 경로
파일시스템의 최상위 경로가 아니다. (/ x)
어떤 지시어에 파일을 명시할 때 /로 시작하지 않는다면 ServerRoot의 값이
자동으로 앞에 추가된다.
ServerRoot "/etc/httpd"
ex)
Include conf.modules.d/*.conf -> /etc/httpd/conf.modules.d/*.conf
DocumentRoot "/var/www/html" -> /var/www/html
웹서버 포트를 지정하는 지시어다.
형식 : Listen [IP주소:]포트번호 [프로토콜]
Listen IP주소:포트번호
Listen 포트번호
실습> IP 주소 3개 설정 후 Listen 지시어 적용하기
-- Server's IP address --
192.168.8.3
192.168.8.4
192.168.8.5
192.168.8.6
-- Server's IP address --
-- httpd.conf --
Listen 192.168.8.3:80
Listen 192.168.8.4:80
#Listen 80
Listen 8000
Listen 8001
Listen 8002
-- httpd.conf --
Server1 conf# iptables -F
Server1 conf# yum -y install lynx <----- 웹에서 직접 ip주소와 포트번호를 적지 않고 간단하게 실행해볼 수 있다.
Server1 conf# nmtui
192.168.8.3 ~ 6 설정
Server1 conf# systemctl restart network
Server1 conf# ip a
Server1 conf# netstat -nltp | grep 80
tcp6 0 0 :::8000 :::* LISTEN 4039/httpd
tcp6 0 0 :::8001 :::* LISTEN 4039/httpd
tcp6 0 0 :::8002 :::* LISTEN 4039/httpd
tcp6 0 0 :::80 :::* LISTEN 4039/httpd
Server1 conf# vi httpd.conf
-- httpd.conf --
Listen 192.168.8.3:80
Listen 192.168.8.4:80
#Listen 80
Listen 8000
Listen 8001
Listen 8002
-- httpd.conf --
Server1 conf# systemctl restart httpd
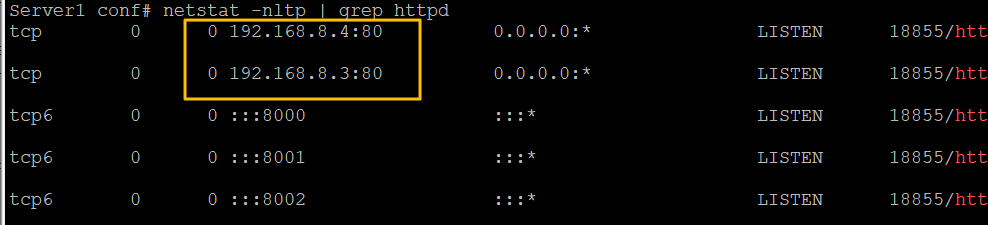
Server1 conf# netstat -nltp | grep 80
tcp 0 0 192.168.8.4:80 0.0.0.0:* LISTEN 4060/httpd
tcp 0 0 192.168.8.3:80 0.0.0.0:* LISTEN 4060/httpd
tcp6 0 0 :::8000 :::* LISTEN 4060/httpd
tcp6 0 0 :::8001 :::* LISTEN 4060/httpd
tcp6 0 0 :::8002 :::* LISTEN 4060/httpd
Server1 conf# echo '192.168.8.3 web directory!' > /var/www/html/index.html
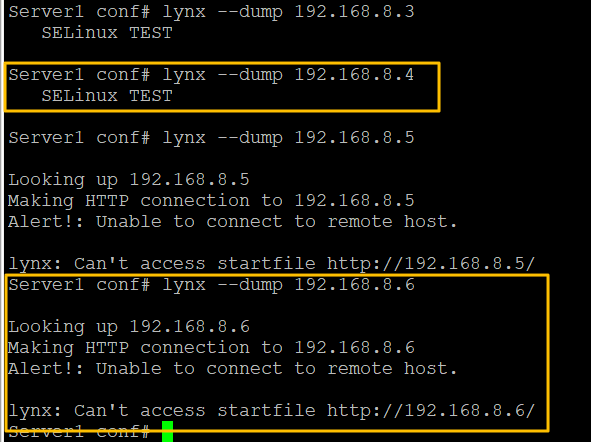
Server1 conf# lynx --dump 192.168.8.3
192.168.8.3 web directory!
Server1 conf# lynx --dump 192.168.8.4
192.168.8.3 web directory!
Server1 conf# lynx --dump 192.168.8.5
Looking up 192.168.8.5
Making HTTP connection to 192.168.8.5
Alert!: Unable to connect to remote host.
lynx: Can't access startfile http://192.168.8.5/
Server1 conf# lynx --dump 192.168.8.6
Looking up 192.168.8.6
Making HTTP connection to 192.168.8.6
Alert!: Unable to connect to remote host.
lynx: Can't access startfile http://192.168.8.6/
이번에는 설정한 포트 번호 및 Listen설정을 지워준다.
우선 httpd를 stop하고 설정파일 httpd.conf에서 Listen 지시자의 값을 80 으로만 남겨두고
semanage 명령어를 이용해서 등록해 놓았던 8000 80001 80002번 포트를 삭제한다.
마지막으로 잘 실행되는 것을 확인하기 위해서 lynx로 실행 해 본다.

아파치 웹서버를 컴파일하는 방법
Static 방식 : httpd 파일 안에 모듈을 모두 포함시키는 방식이다.
DSO 방식 : 동적 공유 객체 (Dynamic Shared Object)
httpd 파일 안에 핵심 기능만 포함시키고 나머지는 모듈 디렉터리에 넣어두고 모듈을 사용할 때 포함시키고 사용하지 않으면 포함하지 않는 방식이다.
아파치 웹서버 데몬의 모듈 목록을 확인하는 옵션
httpd -l
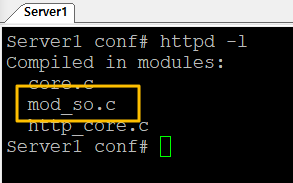
httpd -l
which httpd
ls -l /sbin/httpd
file /sbin/httpd
rpm -qf /sbin/httpd
rpm -ql httpd
형식 : LoadModule <모듈명> <모듈의 경로>
LoadModule foo_module modules/mod_foo.so <-------- 모듈의 경로는 ServerRoot 밑에 있다.
전체 모듈 확인
# ls /etc/httpd/modules
모듈명 형식 : 모듈명_module
모듈 파일명 형식 : mod_모듈명.so
Include 지시어
형식 : include 경로명

---> ServerRoot 지시어의 값이 앞에 붙어서 /etc/httpd/conf.modules.d/*.conf 파일들을 모두 포함시킨다.
실습 > DSO 모듈 설정하기
# cat /etc/httpd/conf.modules.d/00-base.conf
-- /etc/httpd/conf.modules.d/00-base.conf --
userdir_module을 주석하고서
-- /etc/httpd/conf.modules.d/00-base.conf --
<IfModule mod_userdir.c>
#UserDir disabled
UserDir public_html
</IfModule>
아래처럼 하면 에러가 발생한다. 왜냐하면 모듈을 사용한다고 하지 않았기 때문이다.
이러한 에러 같은 경우는 /var/log/messages에 기록된다.
실습> DSO 모듈 설정하기
Server1 conf# cat /etc/httpd/conf.modules.d/00-base.conf
#
# This file loads most of the modules included with the Apache HTTP
# Server itself.
#
:
:
LoadModule userdir_module modules/mod_userdir.so
:
:
Server1 httpd# pwd
/etc/httpd
Server1 httpd# vi conf.d/userdir.conf
사용자 생성
Server1 httpd# useradd user1
Server1 httpd# chmod 755 ~user1/
Server1 httpd# su - user1
Server1 ~$ mkdir public_html
Server1 ~$ echo user1 directory > public_html/index.html
Server1 ~$ chcon -R -t httpd_sys_content_t public_html
UserDir 지시어가 비활성화 되어 있는 경우
여기서는 disabled 로 설정되어 있는 경우이다.
Server1 ~$ lynx --dump 192.168.8.3/~user1/
일반유저 디렉터리에 index.html 파일이 존재해도 웹서버에서 사용자 디렉터리를 지원하지 않으므로
user1 디렉터리에 파일들을 웹에서 볼 수 없다.
Server1 httpd# lynx --dump 192.168.8.3/~user1/
Not Found
The requested URL /~user1/ was not found on this server.
UserDir 지시어가 활성화 되어 있는 경우
여기서는 public_html 디렉터리로 설정되어 있는 경우이다.
Server1 httpd# vi conf.d/userdir.conf
<IfModule mod_userdir.c>
#UserDir disabled
UserDir public_html
</IfModule>
Server1 httpd# systemctl restart httpd
일반유저 디렉터리에 index.html 파일이 존재하므로 웹서버에서 사용자 디렉터리를 지원하기 때문에
user1 디렉터리에 파일들을 웹에서 볼 수 있다.
Server1 httpd# lynx --dump 192.168.8.3/~user1/
user1 directory
!!!중요한 사항!!!
userdir_module 을 주석처리했을 경우에는 <IfModule ~> ... </IfModule> 안에 사용하지 않고
단독으로 사용하면 userdir_module 주석처리를 했을 경우 에러가 발생된다.
-- /etc/httpd/conf.modules.d/00-base.conf --
#LoadModule userdir_module modules/mod_userdir.so
-- /etc/httpd/conf.modules.d/00-base.conf --
-- /etc/httpd/conf.d/userdir.conf --
UserDir public_html
-- /etc/httpd/conf.d/userdir.conf --
Server1 httpd# systemctl restart httpd
Job for httpd.service failed because the control process exited with error code. See "systemctl status httpd.service" and "journalctl -xe" for details.
/var/log/messages : 아파치 웹서버의 시작 시 모듈의 에러가 발생하면 이 로그 파일에 기록된다.
Server1 httpd# tail /var/log/messages
Jan 29 01:34:13 cafe systemd: Failed to start The Apache HTTP Server.
Jan 29 01:34:13 cafe systemd: Unit httpd.service entered failed state.
Jan 29 01:34:13 cafe systemd: httpd.service failed.
Jan 29 01:34:56 cafe systemd: Starting The Apache HTTP Server...
Jan 29 01:34:56 cafe httpd: AH00526: Syntax error on line 12 of /etc/httpd/conf.d/userdir.conf:
Jan 29 01:34:56 cafe httpd: Invalid command 'UserDir', perhaps misspelled or defined by a module not included in the server configuration
Jan 29 01:34:56 cafe systemd: httpd.service: main process exited, code=exited, status=1/FAILURE
Jan 29 01:34:56 cafe systemd: Failed to start The Apache HTTP Server.
Jan 29 01:34:56 cafe systemd: Unit httpd.service entered failed state.
Jan 29 01:34:56 cafe systemd: httpd.service failed.
LoadModule 로 불러들인 모듈을 설정파일에서 사용하는 방법
형식 :
<IfModule mod_모듈명.c>
지시어
</IfModule>
-- /etc/httpd/conf.d/userdir.conf --
<IfModule mod_userdir.c>
#UserDir disabled
UserDir public_html
</IfModule>
-- /etc/httpd/conf.d/userdir.conf --
Server1 httpd# systemctl restart httpd
실습> 웹페이지를 제공하는 권한에 대한 보안 설정 문제
서버를 담당하는 보안담당자 홍길동 대리는 user1 사용자의 디렉터리에 있는
DB접속 파일을 user2 사용자가 볼 수 있는 취약점이 존재하는 것을 발견하였다.
홍길동 대리는 이를 빠르게 수정해서 문제가 생기는 것을 미연에 방지하였다.
홍길동 대리가 사용한 방법은 어떤 방법인지 생각하고 해결 방안을 고민해보자.
***** Hint *****
아파치 웹사용자는 ~user1/public_html/index.html 파일을 읽을 수 있어야 하고
user2 사용자는 읽을 수 없어야 한다.
웹으로 접근하면 파일에 접근할 수 있다.
user2@Server1 ~$ lynx --dump 192.168.8.3/~user1/index.html
user1 directory
파일시스템에서 직접 파일로 접근하면 파일에 접근할 수 없다.
user2@Server1 ~$ cat ~user1/public_html/index.html
X
-- 조건 --
1. 현재 사용자 그룹의 조건
사용자 그룹
user1 : user1
user2 : user2
2. user1 디렉터리의 권한
drwxr-xr-x. 3 user1 user1 129 1월 28 23:43 /home/user1
-- 조건 --
Server1 ~# mkdir -m 755 /etc/skel/public_html
Server1 ~# useradd user1
Server1 ~# chmod 755 ~user1
Server1 ~# su - user1
user1@Server1 ~$ vi public_html/index.html
user1 directory
user1@Server1 ~$ vi public_html/dbconnect.php
<?
$dbhost = "localhost";
$dbuser = "user1";
$dbpass = "111111";
$dbname = $dbuser;
#
# 이후 접속 부분이 온다.
?>
사용자 1 : user1
사용자 1 웹디렉터리 : /home/user1/public_html
/home/user1 권한 :
drwxr-xr-x. 3 user1 user1 129 1월 28 23:43 /home/user1
/home/user1/public_html 권한 :
drwxrwxr-x. 2 user1 user1 24 1월 28 23:44 /home/user1/public_html
-rw-rw-r--. 1 user1 user1 16 1월 28 23:44 public_html/index.html
-rw-rw-r--. 1 user1 user1 89 1월 29 02:15 public_html/dbconnect.php
사용자 2 : user2
사용자 1 웹디렉터리 : /home/user2/public_html
/home/user2 권한 :
drwxr-xr-x. 3 user2 user2 102 1월 29 02:09 /home/user2
/home/user1/public_html 권한 :
drwx--x--x. 2 user2 user2 24 1월 29 02:13 /home/user2/public_html
Server1 ~# useradd user2
Server1 ~# chmod 755 ~user2
Server1 ~# su - user2
user2@Server1 ~$ vi public_html/index.html
user2 directory
문제점은 user2 사용자가 user1 디렉터리에 접근해서 dbconnect.php 를 볼 수 있다.
그러므로 DB 패스워드가 노출되는 취약점이 존재한다.
user2@Server1 ~$ cd ~user1
user2@Server1 ~$ ls
public_html
user2@Server1 user1$ cd public_html
user2@Server1 public_html$ ls
dbconnect.php index.html
user2@Server1 public_html$ cat dbconnect.php
<?
$dbhost = "localhost";
$dbuser = "user1";
$dbpass = "111111";
$dbname = $dbuser;
#
# 이후 접속 부분이 온다.
?>
user2@Server1 public_html$ mysql -u user1 -p111111 user1
user2 사용자가 user1 DB 에 접근할 수 있다.
-- 해결 방법 --
1. 현재 사용자 그룹의 조건
사용자 그룹
user1 : users
user2 : users
2. user1 디렉터리의 권한
drwx-----x. 3 user1 users 102 1월 29 03:11 /home/user1
-- 해결 방법 --
Server1 ~# useradd -g users user1
Server1 ~# useradd -g users user2
Server1 ~# chmod o+x ~user1
Server1 ~# chmod o+x ~user2
Server1 ~# ls -ld ~user1
drwx-----x. 3 user1 users 102 1월 29 03:11 /home/user1
Server1 ~# ls -ld ~user2
drwx-----x. 3 user2 users 102 1월 29 03:11 /home/user2
user1@Server1 ~$ echo user1 directory > public_html/index.html
user1@Server1 ~$ vi public_html/dbconnect.php
<?
$dbhost = "localhost";
$dbuser = "user1";
$dbpass = "111111";
$dbname = $dbuser;
#
# 이후 접속 부분이 온다.
?>
user1@Server1 ~$ exit
user2 사용자가 user1 사용자의 디렉터리를 웹으로 접근하면 접근이 된다.
Server1 ~# su - user2
user2@Server1 ~$ lynx --dump 192.168.8.3/~user1/index.html
user1 directory
그러나 파일 시스템에서 직접 접근은 접근할 수 없다.
이유는 user1 디렉터리는 users 그룹이 접근할 수 없기 때문이다.
$ ls -ld ~user1
drwx-----x. 3 user1 users 118 1월 29 03:14 /home/user1
user2@Server1 ~$ cd ~user1
-bash: cd: /home/user1: 허가 거부
user2@Server1 ~$ cat ~user1/public_html/index.html
cat: /home/user1/public_html/index.html: 허가 거부
user2@Server1 ~$ cat ~user1/public_html/dbconnect.php
cat: /home/user1/public_html/dbconnect.php: 허가 거부
실습 > userdir의 문제점 알아보기
1. 웹 브라우저에서 테스트
사용자가 존재하고 웹페이지를 제공하면 아래처럼 웹 페이지 내용이 출력된다.
192.168.8.3/~user1
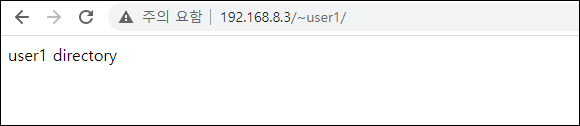
사용자가 존재하지만 웹 페이지를 제공하지 않으면 아래와 같이 출력된다.
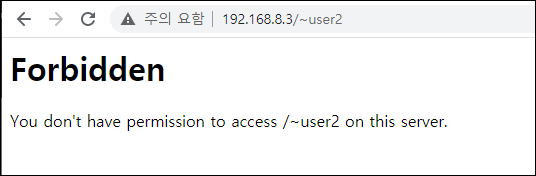
사용자가 없는데 접근하려고 하면 아래와 같이 출력된다.
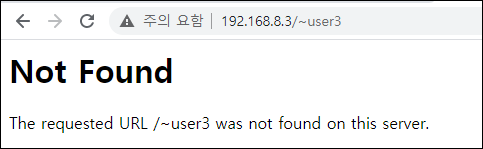
위와 같이 나오면 사용자가 있는지 없는지 확인할 수 있어서 보안상 좋지 않기 때문에 userdir을 막는게 좋다.
기본적으로 막혀있다.
2. 콘솔에서 테스트
Server1 ~# lynx --dump http://192.168.8.3/~user1/
user1 directory
Server1 ~# lynx --dump http://192.168.8.3/~user2/
Forbidden
You don't have permission to access /~user2/ on this server.
Server1 ~# lynx --dump http://192.168.8.3/~user3/
Not Found
3. 파이썬 공격 코드 작성하기
# yum - y install python3
# pip3 install requests
# vi userDetect.py
-----userDetect.py----
#!/usr/bin/env python3
import requests
-----userDetect.py----
#chmod 755 userDetect.py
# ./userDetect.py <--- 에러나나 확인해보기
#!/usr/bin/env python3

import requests

for i in range(1, 11):
    url  = "http://192.168.8.3/~user" + str(i)
    response = requests.get(url)
    print(url)
    response_num = response.status_code;
    if(response_num == 200):
    	print("사용자 존재");
    elif(response_num == 403):
    	print("사용자 존재하지만 권한 없음);
    elif(response_num == 404):
    	print("사용자 없음");
'정보보안(시스템,네트워크) > 리눅스' 카테고리의 다른 글
| DAY_28 vmware로 방화벽 설정해보기 (0) | 2021.02.02 |
|---|---|
| DAY_27 방화벽 (0) | 2021.02.01 |
| DAY_25 OpenSSH 소스설치 (0) | 2021.01.28 |
| DAY_24 rsync + ssh + 공개키 + crond (0) | 2021.01.27 |
| DAY_23 SELinux (0) | 2021.01.26 |